Settings
The Settings screen is where you tune how Octopia Sync exports your catalog and imports your orders, for the active account. Sensible defaults are already in place, so you can leave most of it untouched at first and come back when you want finer control. The options are split into three groups, followed by the order-status mapping.
Prices

Sales season — turn this on only during an official Cdiscount sale period. Cdiscount sends you the start and end dates before each season; enter them in Sales start date and Sales end date, and create the matching reduction in PrestaShop. During the window your reduced price is sent as the sale price; outside it, the higher price is shown crossed out as the reference. Leave it off the rest of the year.
Tax management — enable it if your Octopia account works with tax-inclusive (TTC) prices. The module then includes tax in the prices it sends and recalculates tax when importing orders, so your PrestaShop totals line up. When it is off, offers are exported with a VAT rate of 0. If you're unsure how your account is set up, check with Octopia before changing it.
Smart rounding — nudges your prices to more attractive endings before they're sent (10.53 → 10.59, 10.00 → 9.99). A small marketing lever that tends to help conversion. Purely cosmetic on the marketplace side; your PrestaShop prices aren't touched.
Catalogue
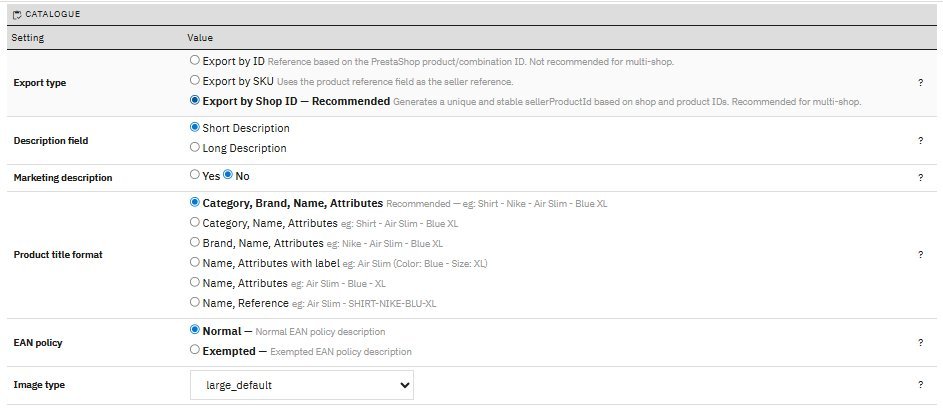
Export type — sets the unique seller reference each product carries on Octopia. It matters because that reference must stay stable over time, otherwise offers get duplicated.
- Export by ID — uses PrestaShop's internal product ID. Simplest, but IDs differ from one shop to another, so avoid it in multi-shop.
- Export by SKU — uses your product reference field. A good fit if your references are already clean and unique.
- Export by Shop ID (recommended) — builds a unique key from the shop and product IDs. The most stable choice, and the safe default — especially in multi-shop.
Description field — picks which PrestaShop text becomes the product description on Octopia: the Short description for a tight summary, or the Long description for a fuller text. Choose the field you actually keep up to date.
Marketing description — optional. Turn it on to send a second, richer description (it allows HTML and links). It comes with strict content rules from Octopia, so only enable it if you'll respect them. When on, a Marketing description field appears so you can choose which PrestaShop text feeds it.
Product title format — controls how each title is assembled for Octopia. Their guideline: product type first, then brand, model, and no more than two descriptive keywords.
- Category, Brand, Name, Attributes (recommended) — e.g. Shirt - Nike - Air Slim - Blue XL. Matches Octopia's guideline best.
- The other formats (Category/Name, Brand/Name, Name with labelled attributes, Name only, Name + Reference) are there for catalogs structured differently — pick the one that reads cleanest for your products.
EAN policy — how barcodes are handled.
- Normal (recommended) — every product must have a valid GTIN/EAN-13. What most sellers want.
- Exempted — skips the barcode requirement, but only works if Octopia has granted you an exemption beforehand.
Image type — which PrestaShop image format is sent. Pick the largest available (e.g. large_default) so your photos stay sharp on the marketplace. The list mirrors the formats defined in Preferences > Images.
Orders
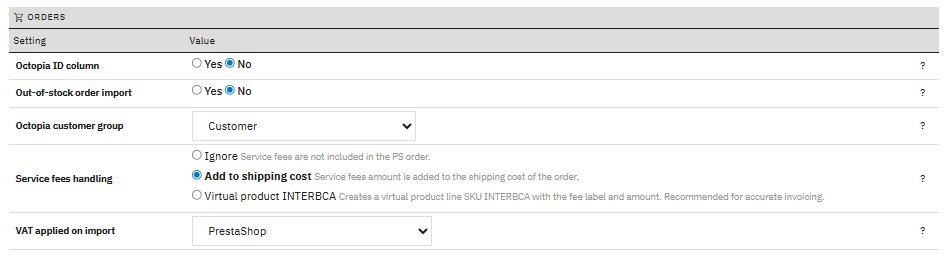
Octopia ID column — adds a column (with a search filter) to your PrestaShop orders list so you can find an imported order by its Octopia number. Leave it off if another marketplace module already adds a similar column.
Out-of-stock order import — by default an order still imports even if the matched product shows zero or negative stock in PrestaShop. Keep it on if you manage stock elsewhere; it stops valid Octopia orders from being blocked over a stock figure.
Octopia customer group — the PrestaShop customer group given to the customer accounts the module creates from Octopia orders. A dedicated group lets you apply specific pricing rules or restrictions to marketplace customers without touching your own.
Service fees handling — Octopia charges service fees on some orders (for example payment in instalments). This decides what becomes of that amount, which arrives already tax-included (TTC).
- Ignore — the fee isn't carried into the PrestaShop order.
- Add to shipping cost — the fee is folded into the order's shipping total.
- Virtual product INTERBCA (recommended) — adds a dedicated line (SKU INTERBCA) with the fee's label and amount. The cleanest option for accurate invoicing. When chosen, set the VAT rule for service fees so the module can work back the pre-tax amount from the TTC figure.
VAT applied on import — which VAT ends up on imported order lines.
- PrestaShop — recomputes VAT from your own tax rules (delivery country, OSS…).
- Marketplace (Octopia) (recommended for cross-border) — keeps exactly the VAT Octopia charged, which is what you want for correct invoicing on cross-border sales.
Order status mapping
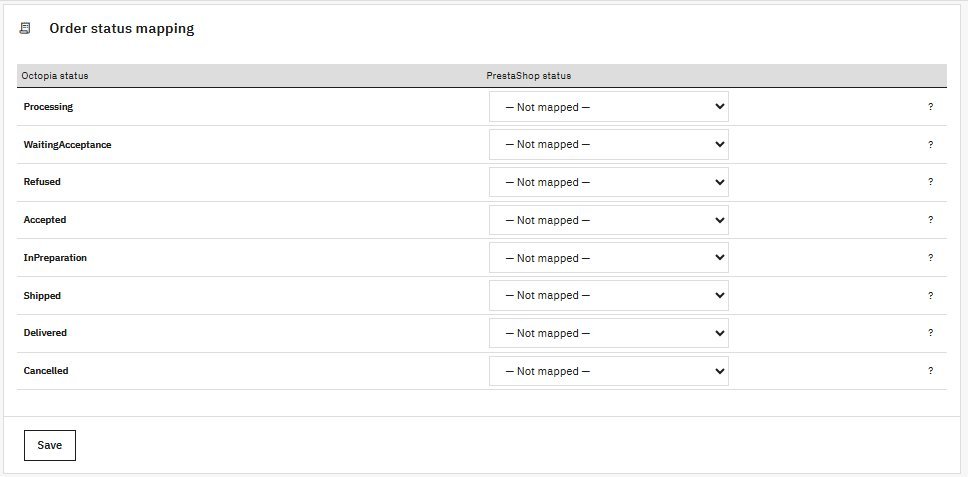
Octopia moves an order through its own lifecycle. Here you decide which PrestaShop order status each Octopia status should land on when the order is imported or updated. Leave a line on — Not mapped — to ignore that status.
| Octopia status | What it means |
|---|---|
Processing |
Incoming order under review, not ready to process yet. |
WaitingAcceptance |
Waiting for you to accept or refuse it manually — only on Cdiscount when manual acceptance is enabled. |
Refused |
Refused by you: the customer is notified and nothing ships. |
Accepted |
Accepted, going through the marketplace's final checks before shipment. |
InPreparation |
Ready to ship, or being prepared by the fulfilment warehouse. |
Shipped |
Picked up by the carrier and on its way. |
Delivered |
Delivered to the customer (not reported by every carrier). |
Cancelled |
Cancelled at any point — by a logistics issue, the customer, or marketplace Customer Service. |